Mastering the Frequency Separation Action: A Photographer's Guide
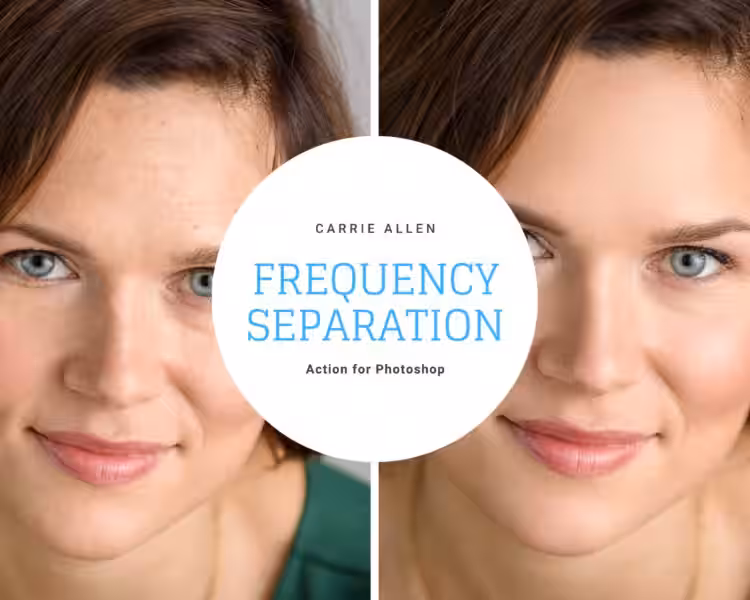
Frequency separation action is a powerful technique used in image editing to achieve precise and natural-looking results, particularly in skin retouching. While it might seem daunting at first, understanding its underlying principles and utilizing helpful tools can significantly streamline the process, making it accessible even for photographers who prefer a more streamlined workflow. This article will guide you through the fundamentals of frequency separation, its benefits, and how to incorporate it effectively into your existing workflow.
- Understanding Frequency Separation: Separating Detail from Tone
- The Two Layers: High-Frequency and Low-Frequency
- The Benefits of Using a Frequency Separation Action
- Frequency Separation for Everyday Photography: Beyond Studio Retouching
- Choosing and Using a Frequency Separation Action
-
Troubleshooting Common Issues
- What is frequency separation?
- Why use frequency separation?
- What are the high-frequency and low-frequency layers?
- How does frequency separation work?
- Is frequency separation difficult to learn?
- What are the benefits of using frequency separation?
- Can I use frequency separation for other types of images besides portraits?
- Are there any drawbacks to using frequency separation?
- What software is needed for frequency separation?
- Are there any pre-made actions or plugins to simplify the process?
- Where can I find more information on frequency separation?
- Is frequency separation suitable for beginners?
- What is the best approach for editing the high-frequency layer?
- What is the best approach for editing the low-frequency layer?
- Can I undo frequency separation?
- What are some common mistakes to avoid when using frequency separation?
- How much time does frequency separation add to the editing process?
- Does frequency separation always improve the image?
- When should I consider using frequency separation?
- What are some alternative retouching techniques?
Understanding Frequency Separation: Separating Detail from Tone
The core concept of frequency separation lies in its ability to isolate image details from the overall tones and colors. It works by splitting your image into two layers: a high-frequency layer and a low-frequency layer. This separation allows for independent adjustments to each aspect of your image without affecting the other.
Imagine trying to smooth out wrinkles on a face in a photograph. If you directly edit the original image, you risk also blurring important details like eyes, hair, and other fine features. Frequency separation prevents this by isolating these elements on separate layers.
The Two Layers: High-Frequency and Low-Frequency
High-Frequency Layer: The Detail Layer
This layer captures the fine details of your image: sharp edges, textures, and intricate features. Think of things like individual strands of hair, skin pores, and the subtle lines around the eyes. Editing this layer primarily affects sharpness and texture. You can selectively sharpen areas or refine details without affecting the overall color or tone.
Low-Frequency Layer: The Tone and Color Layer
This layer represents the smoother aspects of your image, primarily composed of color, tones, and shadows. Adjustments made here impact the overall lighting and color balance of the picture. You can correct color casts, adjust brightness and contrast, and smooth out larger imperfections without altering the finer details.
By working on these separate layers, you gain unprecedented control over the final result, achieving a natural look that avoids the pitfalls of overly processed images.
The Benefits of Using a Frequency Separation Action
Using a frequency separation action, especially a pre-made one designed for streamlining the process, offers several key advantages:
-
Non-destructive editing: All adjustments are made on separate layers, meaning you can always revert to the original image if needed. This is essential for preserving your work and preventing irreversible changes.
-
Targeted adjustments: Edit details and tones independently. This precision reduces the risk of accidental alterations and ensures a more natural-looking outcome.
-
Enhanced efficiency: Pre-made actions automate the complex steps of frequency separation, saving you valuable time.
-
Improved precision: Manipulating details and tones separately provides much greater control than editing the image as a whole. This is especially crucial for tasks like skin retouching, where a delicate touch is required.
-
Consistent results: Using an action ensures a consistent workflow, leading to predictable and repeatable results. This is invaluable for maintaining a uniform style across your photographs.
Frequency Separation for Everyday Photography: Beyond Studio Retouching
While frequently used for high-end skin retouching, frequency separation's benefits extend beyond professional studio work. Incorporating this technique into your personal photography workflow, particularly for family photos, can help you achieve truly impressive results without sacrificing the natural look of your images.
For example, you can use frequency separation to subtly smooth skin without losing texture or detail, or to enhance the sharpness of your subject's hair or eyes. The key is to fine-tune the adjustments to match the desired level of refinement, whether it's a more natural look for family portraits or a higher degree of retouching for professional purposes.
Choosing and Using a Frequency Separation Action
When selecting an action, consider factors like:
-
Ease of use: Does the action have an intuitive interface and clear instructions?
-
Compatibility: Is it compatible with your version of Photoshop?
-
Flexibility: Does it offer customization options to adjust the separation settings?
-
User reviews: Consult reviews from other photographers to gauge its effectiveness and usefulness.
Once you've chosen an action, follow the instructions provided. Many actions will require you to load the action, open your photograph, and then play the action. The action will typically create the necessary layers, make the necessary initial separations, and provide you with layers you can then adjust for smoothing, sharpening, and other retouching operations. This process reduces manual work significantly.
Troubleshooting Common Issues
While frequency separation actions greatly simplify the process, occasional problems might arise. Common issues include:
-
Halo effects: These appear as bright or dark lines around edges. Addressing this usually involves adjusting layer blending modes and opacity.
-
Loss of detail: This can be caused by aggressive smoothing. Lowering the opacity of the layers or using masking techniques can help restore detail while maintaining a smooth tone.
By understanding the principles and utilizing a well-designed frequency separation action, you can effectively enhance your image editing process, achieving professional-level results even without advanced technical expertise. Remember, the goal is to enhance your photos naturally, not to create an artificial or overly polished look. Experiment with different settings and actions to find the approach that best suits your style and workflow.
What is frequency separation?
Frequency separation is a retouching technique in Photoshop that divides an image into two layers: a high-frequency layer containing fine details (like skin texture, hair, and wrinkles), and a low-frequency layer containing the overall tones, colors, and shadows. This separation allows for independent editing of detail and color, preventing accidental alterations to other aspects of the image.
Why use frequency separation?
Frequency separation offers a non-destructive way to edit photos. By separating details and color, you can precisely adjust texture and tone without affecting the other. This is particularly useful for skin retouching, where you might want to smooth out imperfections without losing natural-looking texture.
What are the high-frequency and low-frequency layers?
The high-frequency layer contains the fine details and sharpness of the image. Adjusting this layer impacts texture and sharpness. The low-frequency layer holds the color, tones, and shadows. Editing this layer affects the overall color and lighting of your image.
How does frequency separation work?
The process typically involves using high and low pass filters (or similar techniques) to split the image. The high-pass filter isolates the details, while the low-pass filter retains the base tones and colors. These are then placed on separate layers for independent manipulation.
Is frequency separation difficult to learn?
The basic concept is relatively straightforward, but mastering the technique requires practice. While simple adjustments are easy to learn, more advanced applications demand a good understanding of Photoshop layers and masking. Pre-made actions can simplify the initial steps for beginners.
What are the benefits of using frequency separation?
The main benefits include non-destructive editing, precise control over detail and color, and the ability to achieve a natural look, even when making significant adjustments. It's especially useful for tasks like skin retouching, but can be applied to other areas of image editing as well.
Can I use frequency separation for other types of images besides portraits?
Yes, while frequently used for portrait retouching, frequency separation can be applied to various image types to improve texture and color independently. However, the effectiveness might vary depending on the image content.
Are there any drawbacks to using frequency separation?
The main drawback is the increased complexity compared to simpler editing methods. It takes time and practice to master. Additionally, overusing the technique can lead to unnatural-looking results.
What software is needed for frequency separation?
Adobe Photoshop is the most common software used for frequency separation due to its advanced layer capabilities and filter options.
Are there any pre-made actions or plugins to simplify the process?
Yes, many pre-made Photoshop actions are available online to automate the frequency separation process, making it more accessible to beginners.
Where can I find more information on frequency separation?
Numerous online tutorials, both free and paid, provide detailed explanations and advanced techniques for frequency separation. Searching for "frequency separation Photoshop tutorial" will yield many helpful resources.
Is frequency separation suitable for beginners?
While the basic concept is understandable for beginners, mastering it takes practice. Starting with pre-made actions can help ease the learning curve.
What is the best approach for editing the high-frequency layer?
The high-frequency layer is typically edited using tools that affect sharpness, contrast, and detail. Examples include the dodge and burn tools, the sharpening filter, and the clone stamp tool, used subtly.
What is the best approach for editing the low-frequency layer?
The low-frequency layer is usually edited using tools that affect color and tone. This includes adjustment layers (like curves, levels, and color balance), the brush tool for color correction, and healing tools for larger imperfections.
Can I undo frequency separation?
Because it's a non-destructive process, you can always undo the edits made on the separated layers. However, you cannot directly undo the separation itself without reverting to an earlier version of your file.
What are some common mistakes to avoid when using frequency separation?
Common mistakes include over-sharpening the high-frequency layer, resulting in a harsh or unnatural look, and over-smoothing the low-frequency layer, leading to a loss of natural texture. Also, improper masking can lead to visible artifacts.
How much time does frequency separation add to the editing process?
The time commitment depends on the complexity of the image and your skill level. Initially, it may be slower than simpler methods, but with practice, it becomes more efficient.
Does frequency separation always improve the image?
Not necessarily. It's a tool that, when used correctly, can significantly improve image quality, but it can also produce negative results if used improperly or unnecessarily.
When should I consider using frequency separation?
Consider using frequency separation when you need precise control over both color and detail, especially in situations like skin retouching where a natural-looking result is crucial. It's particularly beneficial for complex images with fine details.
What are some alternative retouching techniques?
Other retouching techniques include dodging and burning, healing brush tools, and using adjustment layers. These methods may be simpler for less intricate edits but generally lack the precise control offered by frequency separation.